Turn Skill Acquisition Into Competitive Success
Just because you can perform a shot in practice, doesn’t mean you can do it in matches. In this article, I talk about the progressive process of turning practice skill into match skill.
What I am about to introduce you to is just one way of acquiring a new skill (skill acquisition) and being able to use it in a real match situation. It’s not suitable for every type of shot or for every person, but as a starting guide it can be useful. Bear in mind that it doesn’t have to be strictly followed. Feel free too skip steps, jump forward or backward, and even introduce new steps based on your experience.
At the end, I will also detail how you can adapt this concept into a practical training routine to ensure you don’t become too complacent in your drills.
Step One: Technique/Skill Acquisition
The first thing you need to ensure is that you have the correct technique! There’s no point in performing the following steps if your technique is faulty. The best way to do this is via coaching. A coach will explain the technique and its reasons, and then work you through a series of increasingly difficult drills. This happens over a period of weeks or even months, and its aim, as well as the steps below, is to achieve what is commonly referred to as “muscle memory”, i.e. the ability to play a shot from a variety of situations without consciously thinking.

Mr. Farag is about to play a skilful shot.
An example of this increasing difficulty would be the coach feeds the ball to exactly the same place each feed, at exactly the same speed. When you are able to perform the shot well most times, the coach would adjust one aspect of the feed, most probably the location of the bounce, then the speed. Each change forces the pupil, you, to adapt and develop that “muscle memory”. over time, the coach feeds the ball with more variety and will also include a second or third shot to introduce decision making into the learning process. This is the basis for what is called Skill Acquisition: learning new abilities and skills.
Step Two: Very Limited Conditioned Game
So now you can actually play the shot, it’s time to begin to transfer that ability into match situations. This can be done with very limited conditioned games. This means that the conditions are very strict, with no decisions involved. For example, perhaps you are working a forehand straight kill and you start with a length-only game, to begin your training session. Then the coach or training partner says that if any of their shots that lands in the green area, you must play your forehand kill.
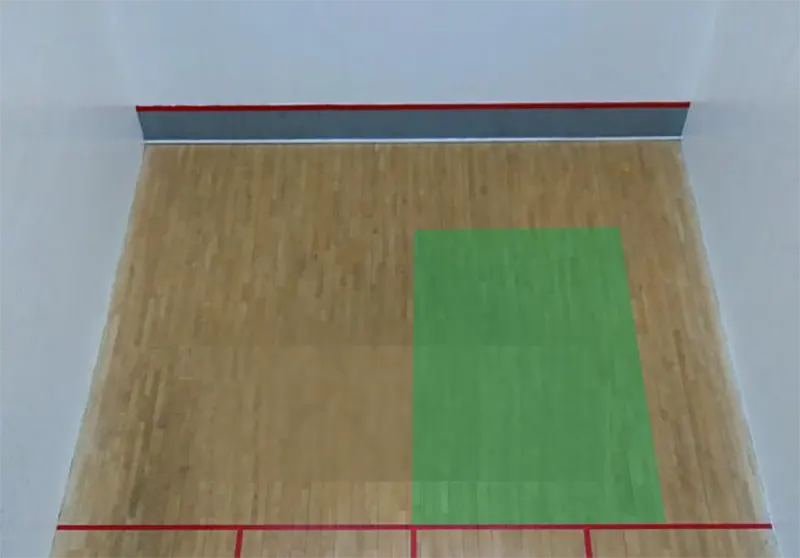
What should you do if the ball bounces in the green area?
The green area would be marked with tape to ensure there was no doubt if the ball is in the area. Over time, the green area would be adjusted, increased and moved depending on the shot and success of the drill.
Step Three: Open Conditioned Game
At this point, the player will begin to make their own decisions. Up until now, ANYTHING that bounces in the green area MUST be hit with the forehand kill (or whatever the shot being improved is). The player only needed to focus on execution, not decision, but now they do. This decision adds a small but vital level of complexity into the drill. The player has to decide if the ball is where they want it to be, whether they are well-balanced and well-position to play the shot.
The coach, training partner or you yourself, might impose some rules around this. For example, you must hit one in five if the ball bounces in the green area. The potential worry is that you might always chose to not hit the kill unless the ball is in the perfect position and the reality is the ball is almost NEVER in the prefect position! Some people need to be forced, or at least encouraged, to play newly-learnt shots otherwise they will never become comfortable.
Step Four: No Conditions – Practice Matches
What happens in this step often depends on whether a coach is involved or not. If the coach is involved, they might play a full court game, but occasionally play the ball into the green area (or a variation of it) and see what the player (you) does. If you don’t play the shot after 5 or so opportunities, the coach may stop and talk to you. Maybe there is a reason for not playing the ball or perhaps you just realize too late. Either way, this might be the time to go back one step and develop more confidence in your ability to hit the shot under pressure.

Has he practiced this shot enough? We will soon find out.
Step Five: Real Competitive Matches
Right, it’s time to actually to begin to play the shot in real matches. Ideally, you would video the first few matches (it’s pretty easy nowadays with cheap action cameras or even phones) or have somebody watch specifically for your sue of the new shot. The two questions to ask at this point are: “Can you hit the shot in real situations?” and “Are you selecting the right time to play it?“. The answers to those questions determine your course of action. One is about ability the other about decision-making. If you can’t play the shot properly, go back a step or two, if you can play the shot but choose the wrong time, look at your thought-process during the rally.
Practical Application During Training
Let’s put all this into something useful for players who don’t have a coach or the patience to work over long-term schedules. Of course, I can’t give a training plan that will cover every shot or problem, so use the plan below as a guide that you adapt to meet your needs.
After a proper heat up (minimum 5-10 minutes) and some basic pair drills (10 minutes), start by playing a length only game. Any shot that bounces before the short line is out. Do this for one game or 10 minutes, whichever comes first. Next, each player (or just one) is allowed one short volley per rally. The service return MUST be played deep. Again, play one game or 10 minutes. Next, each player (or just one) is allowed to hit any volley short. Next game, each player (OMG, or just one!) is allowed on short shot per rally (doesn’t have to be a volley). Next game, one player is allowed to hit the ball in the full court and the other is only allowed to play length, but is allowed to hit one volley short per rally.
Hopefully, you can see the progression of this training session. You don’t do the same thing for too long, you don’t get into bad habits like hanging around at the back of the court when playing length games, and you are constantly adding attacking shots. Perhaps in a future article I’ll provide other variations for you to consider, in fact, it sounds like a perfect theme for a video!
Final Thoughts
Make sure you training sessions always include progressions that have attacking shots.